Add Activity

Figure 432 Negotiation Document > Activities & Attachments Section > Add Activity Subsection – Example Layout
Table 199 Negotiation Document > Activities & Attachments Section > Add Activity Subsection – Field Descriptions
|
Field / button |
Description |
|
Location |
Required. |
|
Activity Start Date |
Required. Click the calendar |
|
Followup Date |
Click the calendar |
|
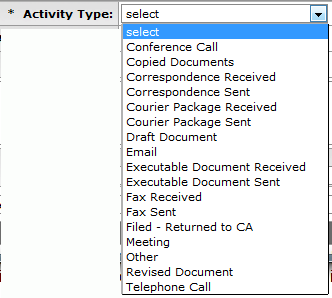
Activity Type |
Required. Use the drop-down
|
|
Activity End Date |
Click the calendar |
|
Last Update |
The date the Negotiation e-doc was last updated is displayed after saving automatically by the system. |
|
Number of Days |
Automatically calculated and displayed by the system, this is the elapsed number of days since the activity start date to the current date. |
|
Create Date |
The date the Negotiation e-doc was created is displayed after saving automatically by the system. |
|
Last Update By |
The user name of the last person to make an update to this Negotiation e-doc is displayed after saving automatically by the system. |
|
Activity Description |
Type text to expand on the Activity Type and indicate a
summary of its unique purpose. Click the expand text |
|
restrict |
|
|
File |
Required. Click the [Browse…] button to
select and upload a local file. The attachment filename is displayed
with an icon
|
|
Description |
Type to enter text that summarizes the purpose of the
file being attached. Click within the text box (or press the
tab |
|
add activity |
Click the add activity |
 Use the


 icon to display a pop-up
window with an expanded text entry area if you want more screen real
estate to type in, and then click the continue button to close the
window and return. After text has been entered and saved, click the
green arrow
 icon to
read it in its entirety in the larger pop-up window, and then click the
close button to close the window and return.
 Click restrict to prevent
the OSP Administrator from viewing or printing details. When this is
clicked, the button changes to unrestrict, and only basic identifying
information may be viewed by them.
 Unrestrict to allow the OSP
Administrator to view all details.
 as a numbered
line item in the Attachments section.
 Click the delete button to
remove an attachment.
 key from a previous
field) to reposition the cursor so that it is within the field, and then
type (or paste from virtual clipboard) to enter text in the box as
necessary to provide the appropriate information.
 button to add the information you
entered and/or selected in this section as its own expandable subsection
below.