Document Configuration Hierarchy
The Document Configuration Hierarchy link in the System group on the System Admin menu causes the Routing & Identity Management Document Type Hierarchy screen to appear. This screen is used to conveniently manage workflow rule templates that serve as hooks into the document routing system, and are relatively synonymous with events. Each Document Type has its own specific Rule Templates. Rule templates allow e-docs to work in conjunction with workflow maintenance e-docs by grouping Document Types with their corresponding Rule Templates.
Routing of documents to one or more persons or groups is achieved by establishing rules that allow action to be taken by a user, group, or role (via Responsibility). In addition to selecting whom is responsible for a document, you can also select the Action Request Code and priority for the document.
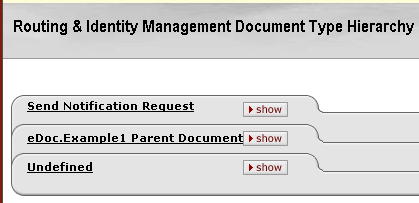
Figure 2140 Document Configuration Hierarchy (Routing & Identity Management Document Type Hierarchy) Administration Screen Example Layout
It displays tabbed sections containing links that allow you to “drill down” to:
• view document configuration information
• view additional information about nodes
• add rules for listed nodes
• search for existing rules associated with nodes
• export information
Tabbed Section Tab Label Links
The underlined text appearing in the section (folder tab) labels to the left of the hide/show button are links that cause the Document Type screen to be displayed in a new browser window.

Figure 2141 Document Configuration Hierarchy (Routing & Identity Management Document Type Hierarchy) Tab Label Link Location
Each Document Type section displays a list of Rule Templates which can be used with it. Links allow you to add new, modify or search for the existing workflow rules.
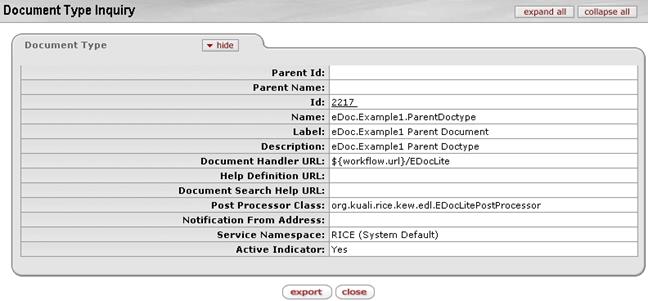
Figure 2142 Document Type Inquiry Screen > Document Type Section Example (as result of clicking Document Type Tab Section Label Link)
View Document Configuration
Clicking the View Document Configuration column heading link in a section allows you to view three section of information in a new browser window. The screen that pops up is labeled Document Configuration – followed by the document name.

Figure 2143 Document Configuration Hierarchy (Routing & Identity Management Document Type Hierarchy) Administration Screen – View Document Configuration Link Location Example
The Document Configuration screen shows the following three sections of information:
• Document Information: View identifying information associated with the document configuration and basic information about the document type. Much of the information here is identical to that available in the Document Type Inquiry.
• Permissions: View template, permission, detail values, and roles information. This section identifies the KIM permissions that are invoked by this type of document. Collapsible sections indicate how the document type is associated with each permission. The Defined for This Document subsection lists permissions that specifically refer to this document type. But many document types receive most, if not all, their associated permissions by inheriting them from parent document types. Additional tabs display this inherited information and the name of the document type from which the permissions are inherited. Because more specific permissions override more general ones, some listed permissions may not apply. The system displays overridden permissions as gray strike-through text.
• Workflow/Responsibilities: View exception routing, route node information, actions by role, and inherited responsibilities. This section identifies the route nodes associated with this document type and displays critical information about the KIM responsibilities associated with them. This section displays system route nodes in the order in which the document passes through them. The system also displays responsibility information for the Exception Routing node that will be invoked for this document type only if the document encounters an error that prevents it from completing its normal routing. Responsibility information is presented for each route node in a standard format.
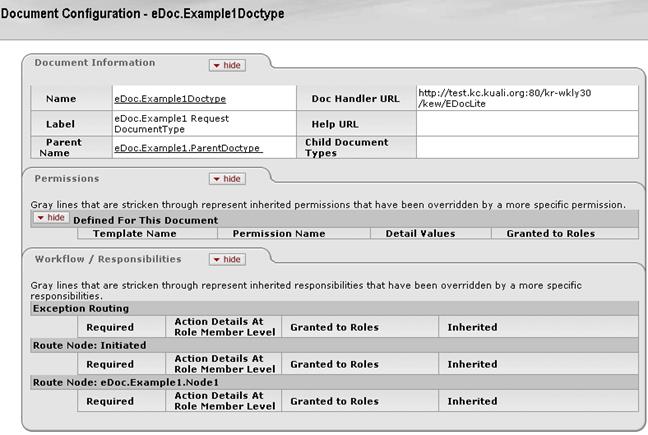
Figure 2144 Document Configuration Administration Screen Example Layout
Table 1154 Document Configuration Administration Screen - Field Descriptions
|
Field |
Description |
|
Document Information | |
|
Name |
The name that uniquely identifies this type of document. If the user viewing the Configuration screen has permission to edit document type maintenance documents, the system also displays the Edit Document Type link. |
|
Label |
A longer, more descriptive name for this type of document. In some cases the name and the label may be identical. |
|
Parent Name |
The type of document that is the parent to (i.e., higher than) this document type in the document type hierarchy. To display the Document Configuration view for the parent document type, click the linked parent name. |
|
Doc Handler URL |
The URL for the document handler associated with this document type. This information is helpful for technical users. |
|
Help URL |
The URL for the online help topic associated with this document type. |
|
Child Document Types |
If this document type is a parent, the system displays all of its types for all of its children document types. To see the document configuration view for a child document type, click the link for the desired child document type. |
|
Permissions | |
|
Template Name |
Display-only. The name of the permissions template on which this permission is based. The template often defines, in a broad sense, what the permission controls. Similar types of permissions have the same template. |
|
Permission Name |
Display-only. The name of this permission. In most cases the permission name is the same as the associated template name.
|
|
Detail Values |
Display-only. Additional detailed information that, when taken with the permission name, defines the permission's function. |
|
Granted to Roles |
Display-only. The roles (i.e., the namespace and name of each role) associated with this permission. In some cases multiple roles may be associated with the same permission. To view the Role Inquiry, click the linked name of the desired role. |
|
Workflow / Responsibilities | |
|
Required |
Display-only. A Yes or No value that indicates whether this responsibility must generate action requests for this document type. If the value is 'Yes' and the document generates no requests associated with this responsibility, then the document goes into exception status. If the value is 'No' and the responsibility generates no action requests, the document continues to route as normal. |
|
Action Details at Role Member Level |
Display-only. A Yes or No value that indicates where the details of this workflow action request are defined. If the value is 'Yes,' the system collects action details when members are assigned to the role. If the value is 'No,' the system collects action details when this responsibility is assigned to a role. |
|
Granted to Roles |
Display-only. The roles (that is, the namespace and name of each role) associated with the responsibility at this route node. To view the Role Inquiry, click the linked name of the desired role. |
|
Inherited |
Display-only. Indicates whether this responsibility is inherited from another document type. If the value is 'No,' the responsibility is specifically associated with this document type. If a document type name appears here, the responsibility is inherited from the specified document type. To view the Document Configuration Inquiry for this document type, Click the linked name. |
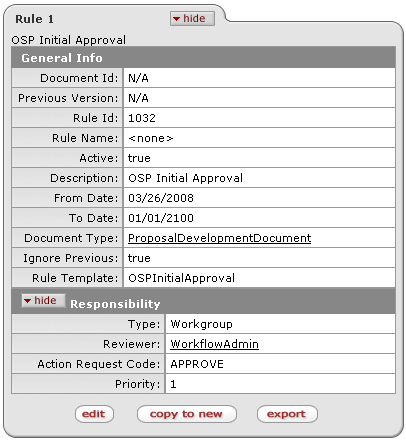
Figure 2145 Rule Tab
Table 1155 Rule Tab Definition
|
Field |
Description |
|
General Info section | |
|
Document Id |
The unique number of a particular e-doc if applicable |
|
Previous Version |
If copied from another rule |
|
Rule Id |
Numeric representation of this unique rule |
|
Rule Name |
Textual name corresponding to the Rule Id |
|
Active |
Select Yes to activate the rule, select No to inactivate the rule. |
|
Description |
Optional. Enter the description of the workflow rule. |
|
From Date |
Enter the date on which the workflow rule should become effective, or search for it from the Calendar . |
|
To Date |
Enter the date on which the workflow rule should become inactive, or search for it from the Calendar . |
|
Document Type |
Display-only. The document type for which the rule is defined. Pre-populated from your search criteria. |
|
Ignore Previous |
Defines if the document should be routed to the approver multiple times when an approver is assigned to more than one workflow route levels. Selecting ‘Yes’ sends one notification to the approver, ‘No’ sends multiple notifications to the same approver. |
|
Rule Template |
Display-only. The rule template for which the rule is defined. Pre-populated from your search criteria. |
|
Responsibility section | |
|
Type |
Select person if the document should be routed to an individual. Select Workgroup if it should be routed to a workgroup. |
|
Reviewer |
Select the user ID or workgroup depending on the Type selection above. |
|
Action Request Code |
Select the appropriate action that the Reviewer should take from the Action list. The choices are ‘approve,’ ‘acknowledge,’ or ‘FYI.’ |
|
Priority |
If routing for this rule occurs sequentially the priority determines the order in which users or workgroups receive the generated action requests. Rules with lower priority numbers are routed before rules with higher priority numbers. |
|
Edit |
Switch to edit mode when viewing display-only report |
|
Copy to new |
Copy this rule’s attributes to a new Rule Id that can then be modified |
|
export |
Export this rule as xml |
|
|
There might be additional, document-specific workflow rule criteria depending on the document type. |
Add Rule
Clicking the Add Rule link for a node row initiates a Routing Rule document.

Figure 2146 Document Configuration Hierarchy (Routing & Identity Management Document Type Hierarchy) Administration Screen – Add Rule Link Location
 To create a new Workflow Rule
with a given Document Type and Rule Template:
|
|
1. |
Click Add Rule underneath the Document Type’s heading, next to the Rule Template’s name. |
|
|
2. |
A new Rule window appears. Enter a description for the rule, in addition to a “From” and “To” date that outline the timeframe for which the rule will be activated. |
|
|
3. |
Select the type of responsibility (user, workgroup, or role). |
|
|
4. |
Enter the name for the reviewer (for example, the user name or workgroup name). You can use the magnifying glass icon to search for users and workgroups. |
|
|
5. |
Select the appropriate Action Request Code and priority for the responsibility. |
|
|
6. |
To add additional responsibilities, click add responsibility at the top or bottom of the form. |
|
|
7. |
You may add an annotation in the space provided. |
|
|
8. |
Finally, select an Ad-Hoc route for the approval of your rule. Your rule may need to be Approved before it is activated, depending on your Role. |
|
End of activity. |
9. |
Click route to recipient. The document is routed to the person or workgroup that is designated as an Approver in the Rule document rule. The Initiator may add an ad hoc Approver by entering the recipient type, network ID or workgroup name, or action request and click the route to recipient button. |
Search
Clicking the Search link for a node row takes you to a Rule Lookup screen, which allows you to further refine criteria and search for rules associated with this Document Type and Rule Template.

Figure 2147 Document Configuration Hierarchy (Routing & Identity Management Document Type Hierarchy) Administration Screen – Search Link Location
Click Search link to the right of the desired rule line from a Rule QuickLinks document tab.
The Rule Lookup screen appears with the Document Type Name and Rule Template already selected based on the rule whose search link you clicked:
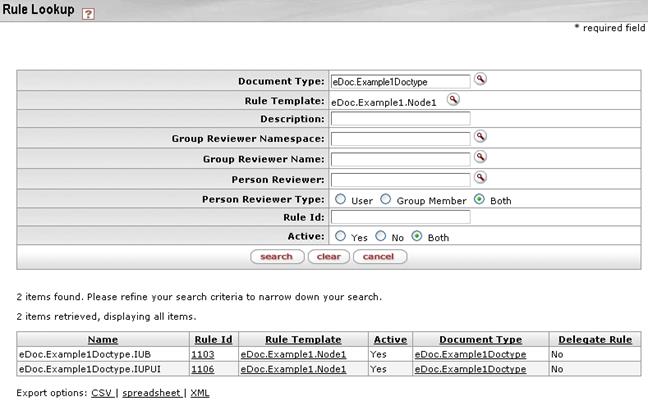
Figure 2148 Rule Lookup Screen Example (result of clicking Node Row Search Link on Routing & Identity Management Document Type Hierarchy Administration Screen)
Enter and/or select additional criteria as desired and click search.
The results are displayed in table format.
From the search result table, click the desired Rule Id link to edit an existing rule.
Viewing A Rule Report

Click the report link from the Actions column of the Rule Lookup result table.
Edit
Users with permissions to edit document types will see an extra link displayed for each type. To initiate a KC Document Type Maintenance document to edit a document type, click the Edit Document Type link for it.
If a given document type does workflow routing, then the system displays the route nodes associated with this type directly below the name of the document. Route nodes are listed in the order in which this document passes through them. Document types with branching routing logic may have further indentation displaying route nodes that a document may only pass through under certain conditions.


