Pessimistic Lock Lookup
The Pessimistic Lock Lookup screen allows you to search for current document locks and view information about them, including the principal owner of the lock, the document type & number, and time the lock was generated. The functionality also allows Administrators to delete pessimistic locks on documents to enable editing of those documents by a user other than the current lock owner (typically the document’s Initiator). It allows you to search for currently-locked documents and remove the locks one at a time.
|
|
The user who is the lock owner needs to be notified in advance of a lock deletion because when it is no longer locked, another user may edit and save the document first, which not only gives them the lock instead, but it also could prevent loss of work by the original lock owner. In order to have the ability to perform document lock delete actions, a user must be a member of the WorkflowAdmin workgroup. | |
|
|
It is recommended practice that after you have been notified that a document you own a lock on will have that lock removed, you copy data and text you have entered into fields that you have not yet saved and paste it into a text file (for example, Notepad), so it will not become lost work. |
|
Access
The Pessimistic Lock Lookup screen is accessible via the following Pessimistic Lock link locations:
• Researcher menu > Quicklinks group
• Unit menu > Quicklinks group
• Central Admin menu > Quicklinks group
• System Admin menu > Configuration group

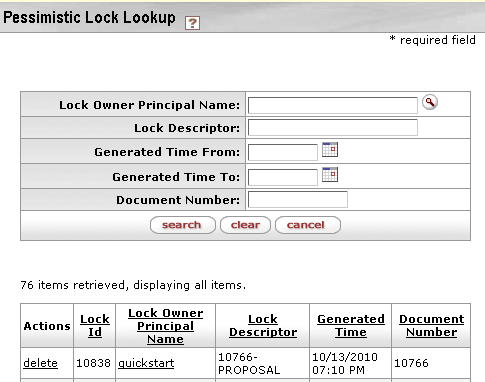
Figure 108 Pessimistic Lock Lookup Screen Field Descriptions Layout and Results Example
Table 37 Pessimistic Lock Lookup Screen Field Descriptions
|
Field |
Description |
|
Lock Owner Principal Name |
Click the lookup |
|
Lock Descriptor |
The document number followed by a dash and then the
document type (for example, 10766-PROPOSAL). Click within the
text box (or press the tab |
|
Generated Time From |
The time the lock was first generated, which is the
time the document was originally initiated. Click the calendar |
|
Generated Time To |
The end date & time for the range in which the lock
occurred as a means to refine search results. Click the calendar |
|
Document Number |
Enter the unique numeric identifier code for the
document, if known. Click within the text box (or press the
tab |
|
Action Buttons |
Click search to retrieve the results, which are displayed in table format below the search criteria area. Click clear to erase previously-entered criteria. Click cancel to return to the main menu. |
 To remove a document
lock:
• Enter criteria as desired and click search.
• Click delete in the Actions column for the document you want to unlock.
You are returned to the Administration Menu.
If you select Document Lock again and click search, you will see that the document you deleted no longer appears in the result table.

Figure 109 Locked Document Access Attempt When You Do Not Have Permission

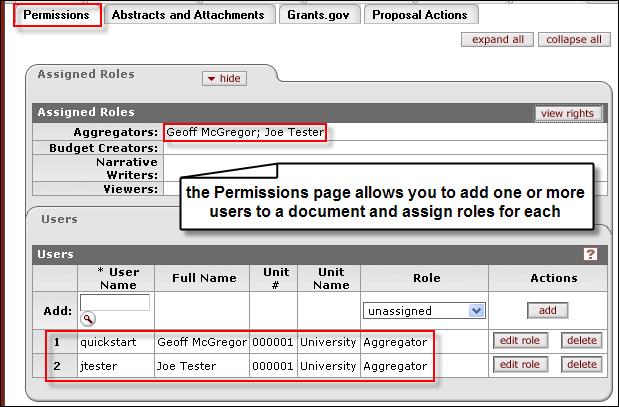
Figure 110 When You Need To Edit A Locked Document, You Can Be Added Via the Permissions Page

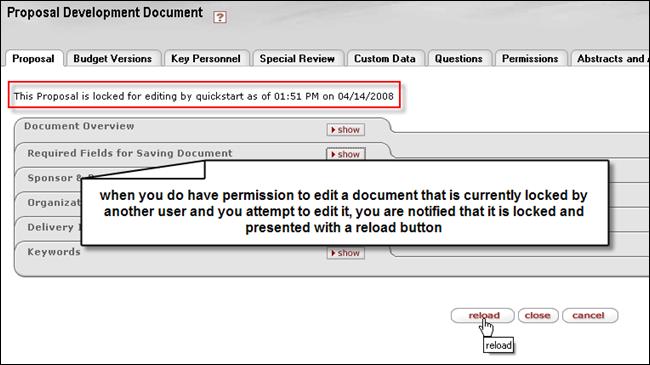
Figure 111 Notification of Locked Document When You Do Have Permission to Edit By Reloading
|
|
Reference: For more detailed and technical information about document locking, see “ Pessimistic Lock” on page 1920 in System Administration > Configuration. |


 key from a previous field) to
relocate the cursor to the field, and then type (or paste from virtual
clipboard) to enter text in the box as necessary to provide the
appropriate information.
